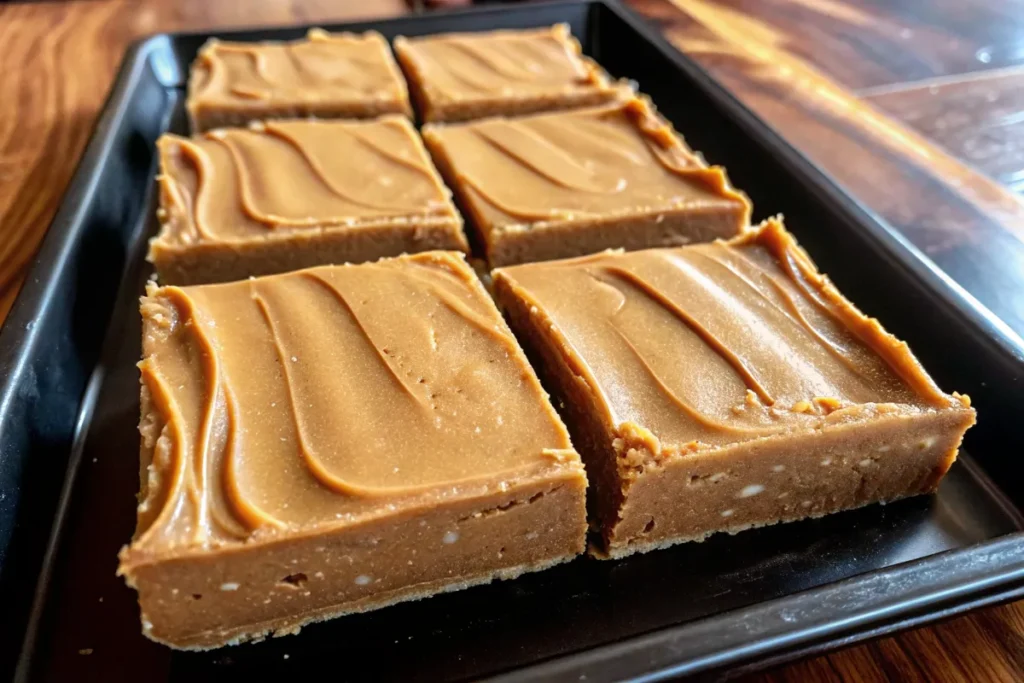
Oh man, let’s talk about those nostalgic peanut butter lunch lady cookie bars that take you straight back to the school cafeteria—trays of gooey, peanut-buttery goodness that made lunch the best part of the day. Ever wonder why these bars hit so hard? I’m sharing the ultimate recipe, some pro tips, and a few laughs along the way. As someone who’s burned a batch (or two) in my time, trust me, I’ve got you covered. Ready to whip up a pan of these bad boys? Let’s get to it!
Why Lunch Lady Cookie Bars Are the GOAT
These bars aren’t just dessert—they’re a time machine. One bite, and you’re back in third grade, trading your carrot sticks for an extra square. What makes them so special? It’s the perfect combo of creamy peanut butter, a chewy texture, and that slightly crispy edge that makes you fight for the corner piece. Plus, they’re stupidly easy to make. No fancy equipment, no culinary degree required. Just a bowl, a spoon, and some enthusiasm.
- Nostalgia factor: They scream childhood vibes—pure comfort food.
- Versatile: Eat ‘em warm, cold, or sneak one at midnight (no judgment).
- Crowd-pleaser: Perfect for potlucks, bake sales, or bribing your coworkers.
My First Batch Flop (and What I Learned)
True story: My first attempt at these bars was a disaster. I misread the recipe and used salted butter instead of unsalted. Yikes. They were more “peanut butter salt lick” than dessert. Lesson learned—stick to the recipe, and always taste-test your batter. Don’t worry, I’ve ironed out the kinks so you can nail it on your first try.
The Foolproof Recipe You Need
Alright, let’s get to the good stuff. This recipe makes about 24 bars, depending on how generously you slice ‘em. Pro tip: Cut smaller squares if you’re sharing with a crowd. Or, you know, keep the big ones for yourself. 🙂
Ingredients
- 1 cup unsalted butter, softened (don’t even think about margarine)
- 1 cup creamy peanut butter (skip the crunchy for that classic smooth texture)
- 1 cup granulated sugar
- 1 cup brown sugar, packed (light or dark, your call)
- 2 large eggs
- 1 tsp vanilla extract (real stuff, not the imitation junk)
- 2 cups all-purpose flour
- 1 tsp baking soda
- 1/2 tsp salt
- 2 cups quick oats (old-fashioned oats work too, but quick oats blend better)

Instructions
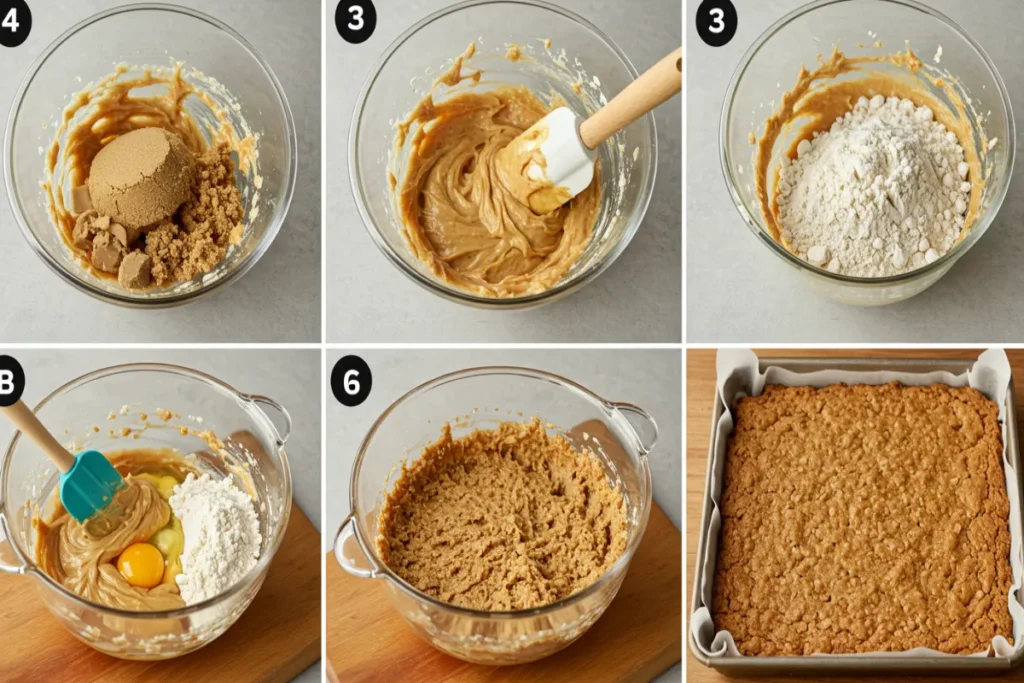
- Preheat your oven to 350°F (175°C). Grease a 9×13-inch baking pan or line it with parchment paper for easy cleanup.
- Cream the wet stuff: In a large bowl, beat the butter, peanut butter, granulated sugar, and brown sugar until fluffy. This takes about 2 minutes with a mixer or some serious arm power if you’re going manual.
- Add eggs and vanilla: Mix in the eggs one at a time, then stir in the vanilla extract. Scrape down the bowl to make sure everything’s cozy.
- Mix the dry ingredients: In another bowl, whisk together the flour, baking soda, salt, and oats. Gradually add this to the wet mixture, stirring until just combined. Don’t overmix, or you’ll get tough bars. Nobody wants that.
- Spread it out: Press the dough evenly into your prepared pan. Use a spatula or your hands (lightly floured) to smooth it out.
- Bake: Pop it in the oven for 20-25 minutes, or until the edges are golden and the center looks set. Don’t overbake—soft and chewy is the goal.
- Cool and cut: Let the bars cool in the pan for about 15 minutes before slicing. Or, if you’re impatient like me, dig in warm and deal with the crumbs.
Pro Tips for Next-Level Bars
- Room-temp ingredients: Cold butter or eggs can mess with the texture. Let ‘em sit out for a bit before you start.
- Add a chocolate drizzle: Melt some chocolate chips and drizzle over the cooled bars for extra decadence. Why? Because chocolate.
- Store smart: Keep these in an airtight container for up to a week. They freeze well too—just wrap tightly in plastic wrap.
Why Peanut Butter Bars Beat Other Desserts
Ever wonder why these bars always steal the show at bake sales? They’ve got that perfect balance of sweet, salty, and chewy that cookies or brownies just can’t match. Let’s break it down:
- Cookies: Sure, they’re great, but they take forever to scoop and bake. Bars? One pan, done.
- Brownies: Too fudgy sometimes, and not everyone’s into chocolate overload. Peanut butter bars are universally loved.
- Cake: Too much effort, and you need frosting. These bars are low-maintenance and still a hit.
IMO, these bars are the undisputed champ of easy desserts. They’re like the cool kid who doesn’t try too hard but always wins.
My Bake Sale Win
Last year, I brought these to a school bake sale, and they sold out in under an hour. I may have bragged a little too much about it. The secret? I added a sprinkle of sea salt on top before baking. It’s a game-changer. Try it, and you’ll thank me later.
Common Mistakes to Avoid
Nobody’s perfect, but you can avoid these rookie errors:
- Using natural peanut butter: It’s too oily and separates. Stick with classic creamy peanut butter like Jif or Skippy.
- Overbaking: Check at 20 minutes. If the center’s set, pull ‘em out. Dry bars are a tragedy.
- Skimping on butter: Full-fat, unsalted butter is non-negotiable for that rich flavor.
FYI, if you mess up, they’re still edible. Crumble ‘em over ice cream and call it a “dessert hack.” 🙂
Serving and Pairing Ideas
These bars are awesome on their own, but let’s get creative. Here’s how to level up your peanut butter lunch lady cookie bars:
- With milk: A cold glass of milk is the classic pairing. Dunk away!
- Ice cream sandwich: Slice the bars thin, sandwich some vanilla ice cream between two, and freeze for a summer treat.
- Coffee break: Pair with a black coffee for a grown-up afternoon pick-me-up.
Ever tried these with a hot chocolate? It’s like a hug in dessert form. Trust me, you’ll want to try it.
Storing and Freezing Tips
Got leftovers? (Yeah, right.) Here’s how to keep ‘em fresh:
- Room temp: Store in an airtight container for up to 7 days. They stay soft and chewy.
- Fridge: Pop ‘em in the fridge for up to 2 weeks if you like ‘em chilled.
- Freezer: Wrap individual bars in plastic wrap, then toss in a freezer bag. They’ll last up to 3 months. Thaw at room temp or microwave for 10 seconds.
Conclusion
There you have it—the ultimate guide to classic peanut butter lunch lady cookie bars that’ll make you the hero of any gathering. These bars are easy, delicious, and packed with that nostalgic cafeteria vibe we all crave. So, grab your ingredients, crank up some tunes, and bake a batch. What’s stopping you? Your kitchen’s calling, and those bars won’t make themselves. 🙂
FAQs
Can I use crunchy peanut butter?
You can, but it’ll change the texture. Creamy peanut butter gives that classic smooth, chewy vibe. Crunchy adds a bit of grit—your call!
How do I know when the bars are done?
Check at 20 minutes. The edges should be golden, and the center should look set but not hard. A toothpick should come out with a few crumbs.
Can I make these gluten-free?
Yup! Swap the all-purpose flour for a 1:1 gluten-free flour blend. Make sure your oats are certified gluten-free too.
What’s the best way to cut clean squares?
Let the bars cool completely, then use a sharp knife. For extra neatness, chill the pan in the fridge for 30 minutes before cutting.
Can I add mix-ins like chocolate chips?
Go for it! Stir in 1 cup of chocolate chips or even M&Ms with the dry ingredients. Just don’t overdo it, or the bars might not hold together.